fashion Image Map

Saturday, June 30, 2012

GIVEAWAY!! Black and Gold Hair Bow- Win Now


Bows for Adoption (Eric and Sarah Clevenger) create bows from re-purposed re-scraps. All of the proceeds from each and every bow go towards adopting their first Child. Here is a link to their Etsy shop, help them out: http://www.etsy.com/shop/BowsforAdoption?ref=seller_info. Give out a hand and buy a stylish and fashionable bow! You will simply love the creative bow accessory, it is for anyone who feels they want to be stylish.

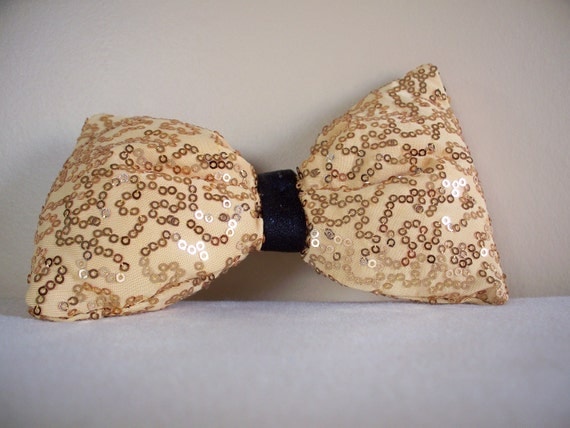
Bows for Adoption is doing a fabulous giveaway for your chance to win a Bow! Bows are very stylish for everyone and go with any outfit of the day. Black and Gold Sequin Hair Bow:

Black and Gold Sequin Hair Bow
                                                 Front 

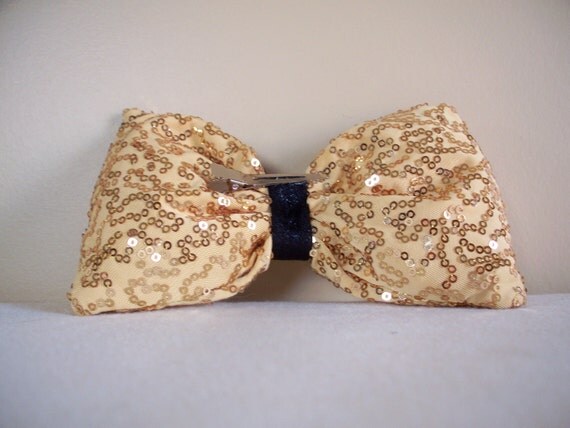
Black and Gold Sequin Hair Bow
                                                  Back


The bow is made with gold micro sequin fabric stuffed with tulle to puff it up and the center of the bow is made of a black shimmer fabric. This bow measures 6" across by 4" at each end and 1.5" in the center. The back of the bow features an alligator clip that has been glued and stitched down for a better hold.


To enter the giveaway you must:
1. Follow any of the listed below (comment for each one you follow in a separate comment and leave your name and contact email address, so I can contact you if you win) by leaving a comment on this post.
- instagram: @lovalafashion
- twitter: twitter.com/lovalafashion
- GFC: www.lovalafashion.blogspot.com (blogger follow)
*Each one you follow counts as an extra entry :)

 2. Extra entry for liking Bows for Adoption on Facebook. Leave a separate comment.

3. Extra entry for liking Bows for Adoption on Etsy. Leave a separate comment.

Also Bows for Adoption is offering 10% discount on all items in their etsy shop with the promo code "FASHION10". Don't forget to mention you were referred by lovalafashion.blogspot.com for the promo code in the comments of the product you buy in the comments.
a Rafflecopter giveaway

The giveaway  is open internationally and ends on 30 July 2012. Enter now for your chance to WIN!


DIY Stud Phone Case


Ayelet Birman (from instagram!) has this wonderful and simplistic DIY tutorial she is sharing
with us today. It demonstrated how to create a stylish studded phone case. Thank you Ayelet!


All you need is:
- an iphone case (or any other cell phone)
- superglue/all purpose adhesive
- pliers
- studs


step 1:


DIY Tutorial- Studs Bra


Vanina Ramacci from italy (found on instagram) has as 
best as she can write up how she managed to create this lady Gaga 
style DIY.


Requirements
-old bra
-Studs
-pliers
Note: There is no need for the scissors


Friday, June 29, 2012

Maive


AN INTRODUCTION TO MAIVE
The founder, four Prasetiya Mulya Business School students whose passion in business and fashion, hit upon the Maive’s name in 2011 when it was established. They took the name of Maive from an Irish word meaning “captivating woman”- quite unaware that the means of captivating is also taken into a book stated that women should embrace her glory, rather than fear her femininity.
The founder stated in this emansipation era, women should embrace her equality and professionalism at work at the same time groom her appearance. But, difficulties in finding suitable office wear for young professional women was a problem.


“It is our philosophy that women should look attractive not only in casual occasion but also in daily office routine.”


Maive’s vision is to provide the greatest one stop online solution dedicated to


Monday, June 25, 2012

Blog Feature: DIY Anthro Inspired Necklace


Khadija is an artist, crafter, DIY lover and textile designer (the list goes on... I also found her on instagram), she has a wonderful blog and has allowed, me to feature one of her DIY tutorials. I hope you enjoy as I surely have :)
I have done another easy & fun version of Anthro's necklace..
Its making is not something like any mathematics formula :) its as easy as 1,2,3..yep..Lets see.. 
An easy way to make something stylishhhhhh...
 Isn't it..

Would you like to pay $248 ? or $2 is Ok..?
~ PROCESS ~
you will need to have..
Crystal brooches
Chain
Chain Bracelet
wire & pliers


Blog Feature: Galaxy Print DIY

Thuy Duyen from http://imrely.blogspot.com.au, has provided us with this wonderful and exciting tutorial on how to bring the galaxy out within your clothes  :) Enjoy!


Hello! It's been a while since I've done something constructive... I have been so busy (the positives of being a senior - hello mid year exams!). Anyway today while browsing online, I had a very, very strong desire to buy myself a pair of galaxy printed leggings, however, the design I wanted was out of stock. Sad times. So I laid in bed thinking about how soon I could get my hands on something galaxy printed, that I could actually pull off.. Have you noticed some galaxy prints cover the whole garment? I don't really like that look, I think it would be hard to wear with other clothes... because it would look really busy with all the colours everywhere! so.. long story short, if I could do a galaxy print on my nails, i could do it on my clothes.. and do it to my liking! Luckily, I'm a crafty girl, so I had some fabric paint stashed away... but only in black, white, blue and teal.. so I decided to use some acrylic paint! that stuff never washes out, I would know. 


Sunday, June 24, 2012

Vintage Wanna Bee: HOW TO: MAKE YOUR OWN BLOG BUTTON WITH CODE/TEXT BOX

So I was having a lot of trouble making myself a blog button until I was linked onto this site by a fellow blogger, and this has dramatically helped me! I want to thank Nichelle :) (Here is a link below for you to make one too)

Vintage Wanna Bee: HOW TO: MAKE YOUR OWN BLOG BUTTON WITH CODE/TEXT BOX

Friday, June 15, 2012

Making A Fabric Flower Brooch


Sometimes we just don’t know what to do with fabric remnants. Here’s an idea : make a flower brooch! Dinny (found on instagram and don't forget to visit her blog) has created a lovely brooch and has been so kind to share how to produce one just like hers. (Thanks Dinny! :)) 


Requirements :
fabric - enough to cut 12 pieces of  2 ½ inch squares
matching thread
needle
scissors
button - for the centre
brooch back
a small piece of felt to create a backing for the flower
fabric glue (optional)


Blog Feature- Flower Power Fascinator


For the perfect spring/summer statement fascinator: full of colour and completely fabulous! Vanessa from Instagram has created this beautiful fascinator and has designed instructions for everyone to try out and have fun! 


What you need:
·        - Fascinator Base
·        - 2 Hair lever clips
·        - 2 Big Fake Flowers
·        - 3 Fabric Flowers
·        - 2 Bunches of wired fake flowers
·        - 6 Wired Fabric leaves
·        - Gold spray paint    
·        - Hot glue gun


Sunday, June 10, 2012

DIY EMBELLISHED CLUTCH


Kasturi S. // Amped+Dangerous, also found below, has written up a great tutorial of a DIY embellished clutch! 


1. Gather your scraps and start stripping your material in different widths. If you're slightly OCD, work with just all being the same width, but I love the look when they are all different sizes and textures.


Friday, June 8, 2012

Peace, love and nail art!

Cassie Joseph from instagram has emailed me the instructions on how to produce fabulous nail art just like hers.


step 1: remove any excess nail polish and paint a clear base on your nails, this well help them last longer. Then paint your nails white.


Wednesday, June 6, 2012

DIY Shorts In A Matter Of Hours

All thanks to Charlie from instagram for this wonderful tutorial! (To find Charlie on facebook and/or instagram keeping reading below.


The sun has finally started to make a presence in the past couple of weeks; the high street is stocking the top summer trends, so surely its time for a wardrobe spring clean? I think not! Why should you pay £10 or more of your hard earned cash on a new pair of shorts when the answer is lying right there in your old jeans that you’ve just put in a bin back. Dig them back out and see how within the hour they can be transformed into shorts that are as good a new.


Sunday, June 3, 2012

1950s Sass

Want the Sassy look of the 1950s, Audrey Hepburn styled glasses, feel a apart
of Breakfast at Tiffany's, below is how to get sunny's looking like hepburns! Hepburn
was quiet a star with quiet a fashion sense and great scheme colour, as it matches with\
 the 1950s black and white theme!

1950s Sass


ShareThis